• Sign Up! To view all forums and unlock additional cool features

    Welcome to the #1 Ford Fiesta Forum and Ford Fiesta community dedicated to Ford Fiesta owners and enthusiasts. Register for an account, it's free and it's easy, so don't hesitate to join the Ford Fiesta Forum today!


Found a Quicker Way...(Segue from Welcome - NEW Member Forum)

Handy Andy

Well-Liked Member
Premium Account
Messages
1,685
Likes
1,265
City
Grand Rapids
State
MI
Country
United States
What I Drive
2018 Ford Fiesta SE HB
#1
I'm re-threading this set of posts over here so the amalgamated - Welcome Thread can hold it's own...

Anyways...

Found a easy way to the Sensor - but - well, I'll let you folks decide this and which route to take.

Firstly, the Ambient Air Temp sensor I have ( or had) was installed wrong - at least when I discovered it...

The Vehicle is new (to me and SOS) so to have this happen and how the Dealers' non-resolution resolve - comes into this a separate beast for it's own, which is beyond my response to post this...

So what you're seeing is my rework...

The Ambient Air Temp sensor is on the Front Skirt by the Snorkel for the Air Box.

I was helping in the thread and since this kinda' reopened an old wound, I figured I'd better do up a post or two as a Salve to ease the effort for the next guy...

So - let's cut to the Chase...
1620860312959.png
That's it!
a roughly $7 sensor​

I took apart the Battery tray and cleaned out the road salt and inspected the tray, holster and made sure all wiring was still in good condition, which requires removal of the Air Box, Snorkel, Air Intake hose, and Left Front Headlamp.

This is so you have clearance to gain access and remove the Battery tray and Battery - check and clean neutralize the acids and inspect, check level and top-off the OEM Battery water - just for a measure of prevention.

The OEM Battery is a Maintenance Free type - take that in whatever way you wish, but it's simply a Battery with plates in a Deep-Well flood design so thru it's normal life cycle, it shouldn't go dry. I said Normal - but what is normal?

,Any Battery maintained well and kept clean and topped off, DOES last longer and in this day and age, it makes more sense to keep what you have working than to take chances on ignorance and lack of car care, being your guide.

Back to the task...

1620860861752.png
This got left dangling and made an annoying Rattle because of the original way it was mounted was
INSIDE the Grille exposed to all the salt debris and Grime so what you see above is the "wash me" moment
If you look below the probe, you'll see the two "Gator" clips - one got truncated,
Caused that when I tried to originally remove the sensor that was inside the Grille.
This view is the Sensor resting on the cutout of the Left front Headlamp I removed..

1620861391739.png
In this view,
The mounting location is at the Grille, you're seeing looking down inside Front Left Headlamp opening
Showing the position of where the Ambient Air temp sensor goes...
Air Box and Headlamp is removed - Snorkel Cutout to Air Box at Upper Right by Radiator shroud.
You can readily see that you can swap out the Sensor easily
just have to take parts off to get the room to obtain access to the Sensor.

The Sensor
1620861850838.png
To protect the Sensor, the Electrical Connector is LARGER of the two,
You press the Tab and the Electrical Connecter as it is the outer SLEEVE that holds the sensor
pull it apart holding the Gator Tabs and TAB of the connector (don't pull the Nose - it's has the Electronics and it could get Damaged)
Those Gator tabs of the Sensor is what holds the whole mess in the Grille,
The Electrical Connector acts as a protective sleeve, the Nose sticks out into the Airstream for the temperature
The Electrical Connector holds this to the harness .
1620862187568.png
Another view to help you see the sensors simplicity and how the connector
protects the Sensor and acts as the load bearing weight to the harness
1620862315166.png
It's got a similar number per the Threads earlier postings, but this is the
NEW Part Number!

Once it's put back together - it looks like this correctly mounted...
1620862401866.png
Reassembly required...
Put you and your car back together as you see fit...
Many thanks to @scotman for his help on this.
https://www.fordfiesta.org/threads/welcome-newcomers-please-introduce-yourself.850/post-16419
 
Last edited:
OP
Handy Andy

Handy Andy

Well-Liked Member
Premium Account
Messages
1,685
Likes
1,265
City
Grand Rapids
State
MI
Country
United States
What I Drive
2018 Ford Fiesta SE HB
Thread Starter #2
Some hints to help others with Battery and Tray issues...

1620872480361.png

Just trying to add in another "How-to's" to to help those who can...

Wear Gloves and Eye protection as much as possible.

In the above mosaic - the Battery is disconnected, then the top Hold down is removed - along with it's Brace - to let you lift out the Battery - keeping it level.

Might want to make sure to clear the area around the Battery, pull off the hose from the Air Intake to the Throttle - loosen the Hose clamp on the Throttle side and remove/loosen the top 4 - #25 Torx screws and the single side mount shock mount for the Air Box Filter base - remove the Breather hose clip from the Air Box Base and gently pry away the Snorkel air diverter.

The Airbox Base can be now pulled pried up gently and removed.

You can now use a 10mm socket and 12" extension to remove the 3 bolts that hold down the tray.
Use a 8mm Socket to remove the first of 2 ECM bolts...
One the Side closest to the Front at the ECM - there is a small dimple - pry this up using a flat blade screwdriver tip to help provide the tension to release the dimple from the Tray - This will help release the ECM's cover - which then exposes the 2nd 8mm bolt - remove it to release the ECM from the Battery Tray and the Tray can now be lifted out.

Best to get it right over to a hose and rise this tray out well with water to remove debris and dilute-neutralize any acid residue.

Inspect it for cracks and stains looking for clues, showing leaking acid
  • - if you see some "water spotting" it's normal
  • - when you see brown color rust mixed in with the water stain, then consider the Battery potentially failed - Cracked case - should be replaced
  • - the Tray if it's only stained, can be rewashed and scrubbed with Baking Sodas and Water mix to restore the Tray to nearly new condition
  • - Inspect tray, the Holster and the bolts used to hold the tray down including the sockets on the car- rinsing and cleaning with Baking Soda Water mix to restore condition allow to dry.
Battery Inspection:

This can be involved, use this only as a guide to help you navigate....
Gently remove - pry up and lift off the covers to the Cells - prevent Dirt from entering into the Cells - keep workplace clean as possible​

  • Look for
  • stains and "yellowing" showing the battery could have overheated or boiled (Erupted)
  • Low water - water spotting - heavy calcium caking
    • - meaning that the Acids inside the cells are now lower, less than ideal in Specific Gravity, use a Hygrometer as needed to check and to visually see if Plates are exposed to air - low/no water, boiled dry
  • Electrolyte cloudy or Oily - contaminated cells - replace the battery
  • - "GREEN EYE" not visible or more than one cell is dry replace (Recycle) battery
    • - it's safer than to try to replenish acids - the plates can be damaged and render the effort useless.
  • Gently inspect the covers,
    • look for Dirt or plugged holes note the condition of the covers and the areas they seal against
    • - high levels of water stains indicates tipping or sloshing of solution and leaked out of the cells to dry in place outside
    • - possibly from loose mounting or the WEDGE the Battery Size uses to keep it holstered in the tray may have corroded and now is gone, lost the ability to keep battery stable and level.
    • - Improperly seated caps and loose covers can cause excessive water loss and in some instances the Battery can freeze in winter and burst - causing the plates and case to crack - lessening the batteries usefulness.
  • Strong Odor the stench of acidic fumes - means the battery has leaked, or has gassed excessively - possibly from overcharging - inspect charging system.
Once you have inspected and cleaned off the battery and tray - all of the hardware and case - if you are satisfied with the cleaning and any repair - you can reassemble the system in the opposite order - with the Battery Ground connection being the last reattachment to the Battery.

1678032924589.png
Rechargeable batteries - any Lead Acid - Nickel Hydride,
Cadmium sulfide or even Lithium Ion...
All use some form of an Electrolyte that stores energy
- that also releases energy but doing the conversion,
the bond that binds the energy is broken and is lost, most likely forever for that particular molecule,
but other free molecules in the (Electrolyte) suspension can then take up the released and freed
molecule from the recharging process.

The above is a guide to help you diagnose, but is not the full guide on Battery care or maintenance - the responsibility belongs to you, but the choice to replace, repair or Recycle also depends upon your ability to do this alone.

Best to have a support of a coworker or supervisor, if you cannot lift the battery out of the tray without considerable effort, there may be a bursting issue and the system needs to be taken to a Dealer or Service center capable of handling the toxicity of this condition - attempts to remove a battery in a bursted or exploded condition can expose to you to extreme harm and acid burns.

Common sense takes precedence over bodily harm and injury due to mistakes and forgetfulness. Due diligence is your only choice - no other options are possible.
 
Last edited:

scotman

Well-Liked Member
Premium Account
Messages
1,874
Likes
1,589
City
Grass Lake
State
MI
Country
United States
What I Drive
2011 Fiesta SE hbk Blue
#3
Everyone should not underestimate the amount of dirt, leaves , bugs, salt spray, road grime (and even a dead bird i found up in there!) That can accumulate as the air swirls through the engine compartment.
I believe that this process of pulling the battery and tray to do some cleaning is a good idea to perform at least every other year.
It is cheap peace of mind in avoidance of the dreaded ground connection rot that many people are seeing. And it really is not an expensive thing to do at all. In fact, its a tiny cost compared to a tow truck call and one hour of diagnosis labor at a competent repair shop.
 
OP
Handy Andy

Handy Andy

Well-Liked Member
Premium Account
Messages
1,685
Likes
1,265
City
Grand Rapids
State
MI
Country
United States
What I Drive
2018 Ford Fiesta SE HB
Thread Starter #4
Wanted to post this here, to help others in understanding how places like a Dealership - will treat your car.

When you do modifications to the car, like dropping in a new motor, delete the AC or Muffler or changing the transmission from one type to another - or even changing the wheels and rims to affect the height - these little things affect the way the car can be dealt with on the Used Car market.

So, if you decide to mod the car then decide to sell it later - the dealership doesn't want to play around with you and your mess - it will auction it off to a third-party market - your ending sale price of trade it is worth as, is at the mercy of this market.

IF you wonder why places like Carvana can even do business?
How about, why your insurance costs the amount it does?
  • - look at your VIN codes to help you decipher the make and model of WHAT IS EXPECTED
  • - and then figure out what you did or CHANGED IT TO when you did these mods, and then understand you are at the mercy of others and what they want in a car when it comes to re-sale.
Attached a PDF of a 2019 VIN explanation thru FORD and there is more information in it to help you when it comes to resellers.
 

Attachments

scotman

Well-Liked Member
Premium Account
Messages
1,874
Likes
1,589
City
Grass Lake
State
MI
Country
United States
What I Drive
2011 Fiesta SE hbk Blue
#5
Sad but true. Trick rims, rear seat deletes, wild graphics and wide body kit installs get zero love from the retail dealership sales managers.
 
OP
Handy Andy

Handy Andy

Well-Liked Member
Premium Account
Messages
1,685
Likes
1,265
City
Grand Rapids
State
MI
Country
United States
What I Drive
2018 Ford Fiesta SE HB
Thread Starter #6
To help in selection:
1659281489916.png

The Go-To plug a dealership would use for a Spark Plug Replacement tune up is usually an SP-525 and base is COPPER, with upgrades to Platinum and Iridium as the type of electrode used.

Double tipped? Spitfire? Ring gap? Read their fine print - it could be that the electrode and its ground are both the same material. OR that the grounding tip - for the electrode - is split or designed in a ring to allow the spark to jump a gap across to the Ground Electrode in a fashion that exposes the spark in a greater surface area - not just to ground. To some enthusiasts - this side-arc gap is claimed to help the discharge to make a better, stronger, ignition source in the chamber by providing more of the discharges energy to be exposed in the fuel-air mixture in the chamber.
  • IN some views, the design of the vertical electrode gap is thought of as a hinderance, where the electrodes and their orientation have to provide a means to make the fuel-air charge mixture ignite so their position in the air fuel flow can hinder the plugs' ability to fire and fire well on a consistent basis
1659303511252.png
1659303558630.png
1659303599080.png
As far as gap, best to review the plugs you're replacing - you can review their gap and even see the change in gap distance that occurs when the spark plugs fire. Small amounts of molten core of the tip and electrode are blasted or moved from their location a process often called pitting - the heat of the spark melts the metal when the spark jumps and strikes against the opposite electrode. The migration of the metal erodes the tip, affecting the gap.
1659282623120.png
To me, it is a good idea to hold onto a set of used plugs until you can safely presume you have installed the new ones correctly. For if something were to occur, refer to the "rough handling" - during the install, you'll need to put the used plug or plugs in to limp the vehicle back to the store you got the plugs from to get a replacement.

As far as Electrode designs, the choice is up to you. But you do want the best or optimal distance from the cylinder head into the chamber for the electrode, as it fires, can ignite the mixture.

Look carefully at the Electrode Wear photo above, note the erosion.

I'm referring to it's tip...

Another closer look...
1659664623317.png
The tip of the left is what usually occurs when plugs reach the end of their useful life.

It's normal - the tip electrode is worn flat, and the ground electrode is worn to a point that the tip has eroded.

One thing to help remember - when you have a simple spark - even with a single electrode, the tips are absorbing the arcs heat - so the broader tip allows for the current in the spark to jump that gap, but the size or amount of the metal that electrode has, can play a role in how efficient the spark can ignite the mixture.

There was a time when it was thought that multiple electrodes offered more a means to ignite the fuel mixture. But as time progressed - the results were disappointing as the electrodes tended to get in the way of the mixture to even make the spark be seen by the fuel and air charge. Much of the arc was wasted energy that stayed too far into the spark plugs well, the area that is the gap between the Grounding tips and that center electrode. The Manufacturers went back to a simpler single-electrode design. - small high energy bursts are the preferred way to ignite a fuel charge in a cylinder. But an electrode that gets too hot can cause a preignition or spark knock you don't want. Thats power being wasted as heat energy - can cause a backfire condition, and if too early in the compression stroke, it can damage the motor. So, they made some refinements and made the tips of various alloys of rare earth metals to make them survive the internal combustion conditions.

Not just the electrodes but where they are placed in the cylinder - and how far in - depth the plug's threaded shaft has to project the electrodes inside - so they can be exposed to the charge in the cylinder.

That distance is called REACH - so if the longer threaded portion of the head is there, it requires the plug to also have the longer reach to meet into the cylinder head at the right height for clearance from the head, and to keep the piston from striking the plug damaging both the plug and the piston.

When it comes to reach, the Wankle Rotary motor has/had(?) a few issues around plugs and their ability to fire inside the combustion chamber.

One being that the combustion chamber rolled over the plug so it had to provide clearance and still remain sealed to keep the chamber integrity so it could fire the plug on the compression stroke.

So Bosch as well as other plug makers had to make a shielded plug so the roller bearing can roll across that area and let the reseal of the chamber begin for the intake So the plug had a short reach and short electrode entry.

1678056177660.png

So, in a way, the multi-electrode design has some benefits but
the drawbacks are from the inability of the charge-air to meet the spark
The Gap is simply too small to be effective.​

To be continued...

Other things to look forward to...

Battery Junction Box, a.k.a. the Engine Fuse compartment...ugh...

Ok, to help with some Relay info ...

F5TZ-14N089-B unless you can read those numbers off the Relay itself...you might be able to save some $$$ by going to a local Auto or even an Electronics shop to locate the relay that follows that pinout.

The terminals can corrode, you'll need help with the TYPE of terminal that goes into that SOCKET on the plastic Relay card used in the box...

Motorcraft WT-1035 - Cheaper than FORDs own numbers KU2Z-14474-FA small, while larger lugs (Heavy current) are DU2Z-14474-GA ok?

BJB or Battery Junction Box, is the Fiesta's' second in-line to provide breakout capability for power tapping.

The First one is on the main Positive Battery post - has Four terminals and a large 450amp fuse to handle the Alternator and the Starter.

When you remove it's cover, that red cover, the terminals are bolted to a buss - which distributes the Battery power thru the threaded bolts with each one having a fused bonding point.

1678057583911.png
In the above photo you can see - starting at the top​
  • - the battery post is bolted to the assembly - you can see the top terminal is fused with a 450Amp and the red wire to it is from the Alternator and Starter system
  • The Buss system then bends down to the side - starting from the Right
  • - which the side mount terminals bussed 60 amp EPAS (Electronic Power Assisted Steering)
  • - Main - 200 Amp
  • - PIC2 - 70 Amp
  • - PIC1 - 50 Amp
Seat Headrest article

https://www.fordfiesta.org/threads/any-way-to-tilt-the-recaro-headrests-back.429/post-25538
 

Attachments

Last edited:

LionsTooth

Well-Liked Member
Premium Account
Messages
739
Likes
964
City
Northern
State
CA
Country
United States
What I Drive
2015 Fiesta SE HB Magnetic
#7
I'm re-threading this set of posts over here so the amalgamated - Welcome Thread can hold it's own...

Anyways...

Found a easy way to the Sensor - but - well, I'll let you folks decide this and which route to take.

Firstly, the Ambient Air Temp sensor I have ( or had) was installed wrong - at least when I discovered it...

The Vehicle is new (to me and SOS) so to have this happen and how the Dealers' non-resolution resolve - comes into this a separate beast for it's own, which is beyond my response to post this...

So what you're seeing is my rework...

The Ambient Air Temp sensor is on the Front Skirt by the Snorkel for the Air Box.

I was helping in the thread and since this kinda' reopened an old wound, I figured I'd better do up a post or two as a Salve to ease the effort for the next guy...

So - let's cut to the Chase...
View attachment 5236
That's it!
a roughly $7 sensor​

I took apart the Battery tray and cleaned out the road salt and inspected the tray, holster and made sure all wiring was still in good condition, which requires removal of the Air Box, Snorkel, Air Intake hose, and Left Front Headlamp.

This is so you have clearance to gain access and remove the Battery tray and Battery - check and clean neutralize the acids and inspect, check level and top-off the OEM Battery water - just for a measure of prevention.

The OEM Battery is a Maintenance Free type - take that in whatever way you wish, but it's simply a Battery with plates in a Deep-Well flood design so thru it's normal life cycle, it shouldn't go dry. I said Normal - but what is normal?

,Any Battery maintained well and kept clean and topped off, DOES last longer and in this day and age, it makes more sense to keep what you have working than to take chances on ignorance and lack of car care, being your guide.

Back to the task...

View attachment 5237
This got left dangling and made an annoying Rattle because of the original way it was mounted was
INSIDE the Grille exposed to all the salt debris and Grime so what you see above is the "wash me" moment
If you look below the probe, you'll see the two "Gator" clips - one got truncated,
Caused that when I tried to originally remove the sensor that was inside the Grille.
This view is the Sensor resting on the cutout of the Left front Headlamp I removed..

View attachment 5238
In this view,
The mounting location is at the Grille, you're seeing looking down inside Front Left Headlamp opening
Showing the position of where the Ambient Air temp sensor goes...
Air Box and Headlamp is removed - Snorkel Cutout to Air Box at Upper Right by Radiator shroud.
You can readily see that you can swap out the Sensor easily
just have to take parts off to get the room to obtain access to the Sensor.

The Sensor
View attachment 5239
To protect the Sensor, the Electrical Connector is LARGER of the two,
You press the Tab and the Electrical Connecter as it is the outer SLEEVE that holds the sensor
pull it apart holding the Gator Tabs and TAB of the connector (don't pull the Nose - it's has the Electronics and it could get Damaged)
Those Gator tabs of the Sensor is what holds the whole mess in the Grille,
The Electrical Connector acts as a protective sleeve, the Nose sticks out into the Airstream for the temperature
The Electrical Connector holds this to the harness .
View attachment 5240
Another view to help you see the sensors simplicity and how the connector
protects the Sensor and acts as the load bearing weight to the harness
View attachment 5241
It's got a similar number per the Threads earlier postings, but this is the
NEW Part Number!

Once it's put back together - it looks like this correctly mounted...
View attachment 5242
Reassembly required...
Put you and your car back together as you see fit...

Also see https://www.fordfiesta.org/threads/2015-se-hb-build.7797/page-5#post-19712
 
OP
Handy Andy

Handy Andy

Well-Liked Member
Premium Account
Messages
1,685
Likes
1,265
City
Grand Rapids
State
MI
Country
United States
What I Drive
2018 Ford Fiesta SE HB
Thread Starter #8
Ok, gonig to add some more info for those that may want a quick reference for parts and the OEM...

ACPZ-1012-H or CV6Z-1012-C
That's the Ford direct reference to their Lug Nuts for the Fiesta and Many other vehicles - possibly all the vehicles listed on this site can use these...

Ok, sizing matters so they are...

For ACPZ-1012-H

19mm Hex Size - (For Lug Wrench or socket sizing)
M12 - 1.50Pitch - thread size
Minimum Length (for fit thread stud length to cap top or thru-hole open end)
Seat type: 60 degree conical - or Acorn Bulge seat - varies due to rim to stud seat type


Capped - 32.1mm
  • The above length are for those that have Wheels that do not require wheel covers.
  • Can be used as needed for all wheel rim sizes - this includes 15" wheels if the Wheel cover is not used - as if Basic Steel Wheel 15jJ X 6
Open End or capped (shown) - flanged for Wheel cover installations - 38.5mm CV6Z-1012-C
1686794592308.png

  • Open-end ones are for those that require a wheel cover that Ford provides - where the Wheel Cover is placed on the wheel then the cover uses the Lug-Nuts to hold the cover to the wheel. The nuts go over the wheel cover and are exposed.
  • these are also recommended for 15" wheels - Check application first
Bulge Seat Acorn(1) for non-covered wheels or Conical 60-degree style for specific rim styles.
  1. Bulge seat Acorn style starts as 60-degree conical then flares out wider than the Hex Nut size
IF you want the usual lug nut replacement - Dorman reference...

1686791890605.png
Longer style that is used for attaching Wheel Covers to the steel wheel when it's mounted to the hub.

Ford Direct cross references CV6Z1012D

1686791849118.png
The above is for starters, but the main premise is if you find a style of lug nut or type of nut you'd like to feature - the basic size is 12mm x 1.50 Fine pitch with a minimum length of 31.1mm and if lug-held covers are used - the minimum diameter of the flange (width) needs to be 29.5mm - pretty much all Ford Wheel nut types are 60-degree conical - with Bulge seat being that it starts out as a 60-degree conical then flares to the larger than Hex nut - size - as the more common type to use.

If you are interested in Wheel covers, for 15" wheel - Ford interchange is 7054, but Ford direct part number is D3BZ-1130-A
 
OP
Handy Andy

Handy Andy

Well-Liked Member
Premium Account
Messages
1,685
Likes
1,265
City
Grand Rapids
State
MI
Country
United States
What I Drive
2018 Ford Fiesta SE HB
Thread Starter #9
Front axle work - bolts and nuts of the problems - or problems with the RIGHT Bolts and Nuts for fixing the Problems

1687141810829.png

1687141782549.png
Another bolt to remember
Ford 7N5Z-00812-A - a 16mm X100mm bolt - this one goes thru the engine subframe assembly - thru the Lower Control Arm Bearing - into the Body

Strut Bolts...
Ford W715490-S442 a 12mm X 50mm bolt - for the struts.
FoMoCo numbers...
Strut Lower Bolt - Ford (W500742-S442)
 
Last edited:
OP
Handy Andy

Handy Andy

Well-Liked Member
Premium Account
Messages
1,685
Likes
1,265
City
Grand Rapids
State
MI
Country
United States
What I Drive
2018 Ford Fiesta SE HB
Thread Starter #10
#Tire Size

Tire and Placard, Rim Size and Type - and other Nomenclature...

1701651372470.png
Those whom own a Fiesta in the USA have these stickers in the Drivers side Pillar and Door Frame,
The things you need to pay attention to are highlighted...
The sticker on the left...
1701653938081.png
Rims are 16 in DIAMETER x 6.5 inches WIDE using J offset
(referring to) the rim goes under (or over) the hub
- tire tucks under and aligns to and with the steering axis and knuckle​

The sticker on the right...you don't need as much info - just the load weight that is EXTRA - because it will affect the ability of the Tire to handle the weight - be it constant (typical load) or the rated capacity (extra or Heavy Duty cycle)

1701657674572.png
Arrows show that extra weight - the Gross Vehicle Weight Rating (GVWR) will include
- the weight of the vehicle without it's occupants (empty)
- and expected MAXIMUM weight of added load - being passengers and cargo
- The also list the maximum weight per AXLE (FR = Front) (RR = Rear)​

  • This is to help you understand some of the numbers and how Tires and Rims you got for your vehicle affect your performance and in some instances - your replacement tire size you might be forced to use and to replace damaged Rims you may not be able to find replacements for - which between those two options - you'll need the above information to help you help the dealer, and/or service department - move forward in fixing your vehicle.
First, Know your Tire type and Size...

Most tires are standard sizes - meaning that; what sells and purchased most often, are based upon the choices from Automakers and the types of tires they want to sell their vehicle with - that becomes the "standard" that the tire Manufacturer makes.

1701645772276.png

  • - so when you see sale flyers on various tires, look at your placard for tire size when you shop, because the Tire dealers SALE prices might be for their Odd-ball sizing that are for vehicles and rims for them, that are no longer made.
    • A big hint here - take a look at your older vehicle tires - the ones you were stuck with when you bought a vehicle from an earlier model year - ever notice the RIMS diameter? In the past 10 years Automakers have gone from a 13" or 14" tire using a 195/70 to 185/80 series tire - to Rims of larger diameter using tires with less and less sidewall.
    • That ratio of Sidewall (your series and sidewall ratio) the number represents the height the rim is from the road - and as that number gets smaller - so does the ability of the tire to handle impacts and road debris without damaging the rim bead to tire bead seal.
    • Granted they did do this for improvements to handling but there is a cost factor of the Tire needs to handle weight, load and survive the rougher roads that larger sidewall tires of just a decade ago, handled with ease and offered a smoother ride.
  • Vehicle models change and so does the requirements the tread designs and lifespans of the OEM tire choice, that forces modifications to that tire. That then forces the Tire Manufacturer to update the tire and tread to a new standard which can also force changes to the OEM tire size the Automaker committed to during the Vehicles years of production.
One thing I cannot stress enough is...

Please Do Not Try to Change the Geometry of the Vehicle by Changing Rim and Tire Size without reviewing the HISTORY and What other impacts these changes you want to have done, will have on the Performance and Handling of your car...

History? Yes, what did the former years of this vehicle use in tire and sizes? The most popular sizes - again - are considered the base for what the Automakers decided to use for their cars - those sizes are also following choices in Output Gearing of the Transmission as well as the Wheel Offsets used per that gearing - as the vehicle was made thru those years - they made changes to improve the handling and increase safety.

IT does not mean you can't go back, you can - but you might not like using what was available during those years. Mostly due to the tread designs and lifespan of the tires - the Rims were "set" during the testing they performed on the vehicle before they introduced the car to be sold - they had to make sure the vehicle was safe and effective - let alone efficient - to drive. .

Tire size, in both width and diameter (perimeter or circumference) affect Roll resistance, Alignment accuracy or error and the Output gearing ratio of the transmission (Feet of Torque available)

Secondary effects of such a change can also affect the ability of the car to handle the weight loading the above placards state.

IF you use a Tire even of the right size - can it properly handle the LOAD RATING the vehicle is rated for?

This is a salvaged pic of my older tires (Optimo).
The size was 195/50/R16 - Spoke rims
The arrow points to the Sidewall of the older tires load rating
That being 500kg, or approx 1021lbs.
1702229787479.png

A tire, even of correct size, might not be able to hold up the weight of the axle with the cars' own weight bearing down on it. The car may be empty but does the tire meet that Weight Load standard? If it can't or barely does, get rid of that tire type - use a tire with proper load limit rating - slightly above is better than being BELOW the originals standard weight load rating.

How do you know what that "Standard load" is?

Look on the Tire - it has it embossed on the sidewall - in both kg and lbs - like shown above or here...
This is the newer set on Steel rims (BF Goodrich Control Advantage)
1702231500850.png
A closer look...
1702231563768.png
These are from a Tire Size of 185/65/R15
I see 560kg or 1235lbs.
And a pressure rating of 44PSI max for inflation.​

Ok, the fuss is for you to know how to find that load rating - and use a rating that is as much as (equal to) or greater than, that - of your original tire load ratings.

This is a factor of safety and performance - refer back to the placards photo of mine.

Remember you were dealing with a makers original design - and even though the LOAD rating for the axles is 1850lbs. Front and 1800lbs Rear - they divide this by two for each axle per side - so you can see the above OEM (Optimo) tire was higher than the stated if you had loaded and divided the weight equally - you still have load shift and sway as a factor - so they did provide some factor of safety in figuring this out.

The newer tires I currently use are (Relatively) larger in size, but are for a different Rim size - so the Circumference (perimeter) and diameter are similar to OEM - but by doing the larger sidewall change and using a smaller rim size, not just by type of Rim, but by its design in size and width, also includes both Rim Width to Tire Width and Perimeter or Circumference - gives me a better ride and I also was given a flexibility to use a set of Tires that have a larger factor of load limit safety in doing so.
  • Remember too, it helps to know the past History of the vehicle - it's options and the looks - what they used back then were for a type of enthusiast - the needs of the enthusiast have changed thru the years, so the maker tries to cater to them to keep the car in production.
  • So look back in the history of the vehicle for the wheels, the trim - any tire options - they can help in providing more choices to fit a tire and improve the ride and performance to your needs.
Another issue is of the alignment and position of the tire in respect to the pivot point (front-steering) and roll accuracy of the rear solid axle as a change of thrust angle.
  • As you go wider in Tire size, other considerations come into play here. One mostly of fitting the tire into the wheel-well without rubbing the tire against the trim or the inner fender well.
  • Another is the Rim - if your decide to change the Rim - remember too that the type of tire needs to fit on the type of Rim you are thinking of using - let alone the fitment to the fender and wheel-well.
  • In Selections of Rims, there are options like Size (Diameter) Width and Offset.
    • Along with Bolt pattern and Hub Cutout diameter (Centerbore diameter)
    • Ford Fiesta uses the Centerbore as part of the Fitment and Hub loading so the Centerbore diameter is 62.5 ~ 63mm diameter or 2.5 inches.
      • It is a requirement Ford uses to fit the Rim and keep it centered onto the Hub.
1702250071883.png
There is also the change in the Rim WIDTH and how the Tire rests - and then there is the issue of OFFSET the whole Wheel Assembly - when mounted - fits to and is a level of distance from, the Rim center to the outer edge.

1703390243442.png
Along with...
1702265705896.png
Wheel Offset is simply a measured distance from a Rim's centerline - to where the Flat surface is that you place on the Axle Hub when you put a tire on your vehicle.

Don't need to make it complex, that "offset" helps the Wheel (Tire et-al) contact surface to the Road - stay in a spot designed by the Maker. This "spot" is usually, Right where the Steering Axis (your tires point of rotation to turn or steer the car) is located, usually just below the Steering Knuckle.

What makes it complex is due to the Aftermarket - A Fiesta is originally designed to use a Rim of 15" or greater, in a "J" shape (Refers to how "sharp" the Spokes or Rim mounting surface shape or flat and square to the Rims edge)
1702351094173.png
The "J" designation helps determine the type of seal that Tire Bead or Shoe rests on,
And how it rests on the seat to seal the bead.

This also helps explain the reasons why WIDE tires of larger "P" -Size values
when they are put on smaller profile - or narrower rims - cause problems.


Same can be said about Smaller - P-value tires
- too narrow of a tire on a too wide of a rim, can not only cause a seal rupture
but a failure at an inopportune tine and cause a crash.
Since I live in an area that is both Salt and Pot-hole havens, the issue of having a tire too small could leave me stranded and possibly stuck with a very large bill in replacing the whole wheel and rim in repairs let alone the Alignment headaches caused by such damage from impacts.

So if you can spare (ahemn) a moment - also look at your spare tire - even refer to that placard showing the tire size of it.

See how they put in the Rim size? Locate that second placard the one with the GAWR - note the "J" and the size?

Then note the size used for the SPARE.

Best to find a tire size that has the same or similar measurements in both Rim diameter and width and Tire size in perimeters or Circumferences and or diameter between the sizes shown on that placard.
  • What I'm getting at here is to make sure you have a tire that is properly designed for the Rim width, and Bead Type (J or otherwise) - so you can drive safely on a tire that is seated properly and can handle the load rating the previous set of tires was rated for.​
  • The Spare tire - is a limited service - and can also have a different diameter - making this a more difficult situation in which to change out the bad tire to put on the spare. IF the Diameter if the spare is too small, the height of the car, after the spare is installed, can change. This might make parts of the vehicle, the undercarriage, too close to the ground and can get damaged by it's low profile getting hit by road debris or striking uneven surfaces.​

Easiest way is - measure your tires from side to side - right across the centerline of the hub to find the diameter - should be between 24.5 to 23 inches - this is your best size to give you your torques and speeds and proper speedometer measurement of speed you travel along.

IF you need help understanding this - go here

1703457743368.png
When tires of about the same size are used...
Note the Speedometer error - there is none.
Here's a visual example - the sizes are CURRENTLY being used in my own Fiesta - so this comparison only deals with sizes to make the tire about the same size in both perimeter and diameter - but road surface contact patch is different.

But...
When they are different sizes - like to obtain ride height
note the differences!
1703550432559.png
Tire 2 may be a NARROWER tire - but it's sidewall - being a 60 series,
changes the sidewall height and also the ride height. OEM is Less Height and has a Wider tread.

With me so far?

Let's try my SPARE TIRE size to get an idea of how drastic this can get...
1703547401020.png
Tire 2 is is the SPARE TIRE size
- and so the comparison becomes how you think how fast you're actually going
versus the systems own thinking on what speed you're at, using the OEM size.
this is done to help demonstrate a point.

If your tires are too small, you may have great torque, but no ability to cover any distance. People pass you even if you think you're doing 80MPH. A similar opposite effect can also occur using tires that are too large - while too large of a diameter of tire can make your car profile higher from the road to miss all the rocks and debris, it can also make your drive difficult to control by acting sluggish, hard to steer and not accelerate very well.

So keep the Tire size changes reasonable...

When you go up one tire size, you affect the width and diameter and height - which can then affect the GEOMETRY of the steering the car has and can exacerbate and amplify any alignment problems the vehicle has.

How?

By affecting the contact patch - the part of the tire that makes contact with the road and where all the pressures to move the car in any given direction, occur - the part of the tire that rolls on the road

Wrong tire sizes also affect how your vehicle calculates and what you perceive as speed. Tires of too much diameter/Perimeter - roll a longer distance per revolution - which might get you a speeding ticket due to the error in the system to measure speed of travel because your tires are covering too much distance in road per revolution than the system is set up to calculate. You may be speeding and not even know it.

Added for future project expansion

...Stay Tuned...
 
Last edited:
OP
Handy Andy

Handy Andy

Well-Liked Member
Premium Account
Messages
1,685
Likes
1,265
City
Grand Rapids
State
MI
Country
United States
What I Drive
2018 Ford Fiesta SE HB
Thread Starter #11
This is an ongoing and incomplete - unfinished - post so check back as you can.
1703551206531.png
Contact Patch - Where the Rubber Meets The Road...
Not to place too much emphasis on it...

But it does matter.

This section is more about understanding why Offsets are used, and if you use the wrong offset - the Tire can cause strange and even unpredictable behavior that can put you in a crash.

The Offset is used to help the vehicle follow a track and stay true to it - to do that; requires the tire and it's contact points or patch where the tire meets the road follow the alignment track. If the Offset is not right, the tracking the vehicle will make - will also be impacted. So all the vehicles tires need to roll along in the same fashion using the same offsets and tread designs to help maintain the vehicle rolling in a straight line and/or make turns without severe impacts on the steering assembly or to make the turns difficult for the operator to perform and complete.

To help - if the vehicles alignment is set up to have the contact patch set right (the pivot point where the tire rotates exactly over the spot) at the axis of turn, then use a wheel rim that places the tire away from that point - using an Offset that alters where the patch rests - will also affect the steering track and how rough impacts from uneven pavement can damage the steering system and overall; affect how the vehicle will perform in handling.

The Contact Patch is a spot, simply a pressure point - the tire presses down and the road presses up - between the two you get the friction coefficients - for the amount of friction at any given time and condition can change the ability to steer, brake and even stay on the road.

1703559275153.png

So why are you using a smaller tire?
Honestly I'm not, I'm using a Narrower tire - not smaller.

This changes the contact patch and how it distributes the weight it needs to carry.
  • - it may have less surface area but has the height of the OEM and the Height of the one I use
  • - I now used two types of tires and their sizes - for the seasonal conditions of where I live and are based upon the amount and type of driving I do.
    • Winter driving requires a good tread with a footprint similar to a typical "studded" tire - it has many grooves and channels in the tread to push away water and snow in the contact patch - along with sipes to let the water that may still be trapped - find a quick exit so the tire doesn't lose contact with the road or the surface it's riding on.
    • When dealing with Snow, Mud or Rain, tires use tread designs to help them maintain contact. So the tire itself will have a designation based upon it's tread and it's effectiveness.
1708882197798.png

  • Tire Tread and traction - a good article can be found Here to help you and the site has resources to help you find more information. about what is being discussed in this thread.
    • The two imprints if you find them on your tire means the tread and the contact patch it has - has a traction designation of Mud and Snow - which means the tire is designed for many conditions including specifics like winter cold and snow. Not all tires will show both embossed on the Sidewall, so pay attention to the lettering and or the Symbol - the symbol of Three Peaks or Alpine appearance is an introduced later-upgraded symbol for the M + S but does not mean that former M + S designations are invalid, just that tread design can change thru the years so older sets of tires and even their new replacements may still show M + S designation.
    • Same can be said for my Summer season tires. Only that with Rain and heat - affect the ability to hold the tire onto the road - by composition and design.
    • So I use two sets of tires that have difference traction coefficients for the seasonal changes and predominate seasons they will be used in.
  • Wet and rain conditions leave water on the road so the tread designs have to be able to force out (displace) water as much as possible.
  • So sipes and tread-designs help the water channel and move - escape with little effort, pressure or displacement restriction which is important to prevent pressure waves from building up just in front of and under the tire.
    • for if your tires can't push or channel the water and films away from the tread meeting the road - this can build up pressure waves - which leads to hydroplaning - where the tire no longer meets the surface.
    • - instead the surface tension of the water forms a film and with the oils left behind from the traffic on dryer days - this film can reduce the effectiveness of the contact patch because the pressure wave forming in front of a moving tire can hold enough fluid - that can lift (counteract against) the weight bearing down on that contact patch.
  • - you can lose the ability to control if the pressure (the downward weight) of the tire on it's contact patch by using a tire of improper size
    • How? - per the surface area of the contact patch - larger that patch is, the less load placed per square inch of area that can contact the road. That is what you get on a wider tire versus this same weight spread out across a smaller contact patch area on a narrower tire - where this weight is higher per square inch of contact, Changes the way forces act to displace water or snow. Additional downward force added by the increased weight distribution - on a narrower tire, can help in forcing the water to displace away from the contact patch.
I live in a suburb of a larger city - and although the roads in the area are relatively in good shape - I still commute thru and to an area that has roads in rougher conditions. So not only do I need a good tough tire and tread, but ride height that offsets possible damages from potholes that can otherwise cut and damage tires and rims if the clearance needed is too little and the outline and depth of the pothole can cut into the tire and deflate it nearly immediately.

Also, the issue of about contact patch may help you know why a narrower tire - being that the contact patch is "narrower" also changes the way the vehicle can handle in winter, like on snow - ice and even simple rain.

Do this experiment someday, or at least when you park your vehicle overnight - take a look at the footprint it leaves behind in the parking spot.

Wider tires leave a different outline or contact patch than a narrower tire. Simply due to how the weight presses down on the tire - which can change the way water, snow and ice, and the friction forces that the tire exhibits.

Don't be misled, I'm using a narrower tire due to the surfaces I use it on.

Mostly pavement and concrete.

Wider tires give a benefit of a more wider patch, which can travel over more rougher surfaces and survive gravel roads and raw terrain, but within reason.​

Road friction - grip of the tire, ability to steer and control and the cost - are some of the reasons why wider tires are not the best choices for what conditions you may drive the vehicle thru.

  • The reason why this contact patch comes up.
  • Think of the tire rolling on the pavement surface, how it meets the road - rolls (transfers the weight) to motion - then lifts off.
  • How that patch forms is where those forces of the tire rolling apply themselves onto the road using friction as a means to transfer those forces - tread design, weight on the patch and what is between the tire and the pavement are just some of what can make difference in how these forces move you or force you to respond.
  • Many different type of tires make different impressions on the pavement surface - below are just a summary of the many ways a contact patch can appear - and why tires act the way they do when you steer them.

1708827101719.png

  • Flat (rectangular) - where the width of the tire and the approach of the tread as it rolls onto and makes contact to the surface is more blunt and flat much like a ruler or box - looking at it from above the surface of the road. This type of patch has a blunt and difficult to balance approach to uneven surfaces for steering can be affects as per line of travel it may want to "wander" away and may make the steering wheel feel too tight and subject to subtle yet, required, correction of travel due to the wide patch. These unbalanced responses to the road surface can make trips tedious as to the necessary corrections and steering wheel fixation you need to apply as the tire rolls and uses to bear weight can make even small pavement imperfections noticeable in an otherwise normal steering geometry had you used a proper size tire and offset.

1708827712013.png

  • Circular (circle pattern) a more ideal pattern to have - where the width of tread makes the patch appears more circular. You can visually see how the tire looks more like a cross section of a circle - this can have a dramatic effect on how water and fluids trapped by the pressure of the tire above it, react and flow around - below in-between the tire and the pavement - both the tread design and use of sipes can have dramatic effects on how these trapped fluids can move or get displaced. These contact patches are the most ideal for all the forces working on and thru the tire as it rolls along - this usually indicates a tire and wheel size used that has the proper offset for all the weight on that tire from the vehicle axle or strut is evenly distributed and also makes the steering performance much easier.
1708827888488.png

  • Oblong along the direction of travel - ovals - these types of tread offer the least amount of rolling resistance in the predominate line of travel - straight ahead (up and down on this page) however during turns, they tend to crab or force the wheel back to it's line of travel - by the axial - line (Direction) of travel forces, including alignment errors caused by excessive toe-in or out. Misaligned tires rolling resistance caused by poor tracking from maligned tires, are unequal and friction caused by that elliptical patch to "Stay in a path" forces constant steering correction and or cause uneven tire wear and premature suspension failure issues. The longer line is the axis of travel the patch wishes to follow. The correction recovery forces are caused by narrower tires - you don't want too narrow of a tire for it cannot support weight it may have to carry and can cause extra wear by the friction caused by misalignment or even from the tires improper offset to the steering axis if you use wheels and rims having different offsets.
1708828468197.png
Narrower tires are also problematic. If you use a size not able to handle the road surface, you can lose the ability to continue to drive on the surface and the vehicle will sink into it (mud, sand - even snow) and by the weight of the vehicle will place on the tire at any given moment - could exceed the rating of the tire and cause a premature failure.
  • Yes, I said snow, but when you are on a flat pavement road surface that is hardened with ice and the snow is on top, you can toboggan over the snow, and lose traction - on wider tires.
    • Less traction on wider tires?
    • Yes, if you deal with snow and or rain - the larger broader surface the tire bears weight down on - can reduce the traction by having less weight over the area in contact with the water that is laying on the surface of the road.. The tire would or could "float" on the "Surface tension" that the water would have. This effect is greater on larger contact areas than smaller or narrower tires and "knobby" tread designs that have less surface area
    • On snow, the grip of snow has a coefficient that is much less than 1 - more like 0.2 to 0.3 - a 70% reduction - so the contact patch itself needs to bear down weight on the area - which helps multiply that factor as a means to provide traction
    • Less friction caused by oil and other fluids like coolant and brake fluids that can be left behind on the road, mixing in and making a type of "soup" that can lessen the level of friction to more of a like coefficients closer to snow..
    • On narrower tires rolling on rain wet, slushy or wet snow roads, the vehicle can use the tires narrower profile to form more of a set of skis that - while you have less width for contact, the skiing effect lets to steer and maintain some form of control when the snow is letting the tire sink. Smaller accumulations or low levels of wet heavy snow can actually help the vehicle to steer by providing a force much like a rudder to help the tire maintain a track thru the snow.
      • Partially the reasons many people get the vehicle stuck in snow, is due to the lower profile the undercarriage - gets the vehicle stuck in the snow, by increasing the drag - you don't have any true clearance.
      • Trucks use the wider tires to handle their weight, expected load, and road height - passenger vehicles don't, or at least they are not built for high profiles nor for that type of challenging terrain trucks and SUV's are able to drive on.
        • Remember, It gets more expensive as you go higher in profile and terrain demands that force you to use a vehicle with higher road height and clearance.
  • As with any choices, you have to determine if the cost of driving with wider tires versus the narrower width - affect your ability to control the vehicle.
    • As said earlier - you do not need to make large changes to affect the effectiveness of the tires and the tread you choose to use. Large changes can seriously hamper your ability to drive and control your vehicle.
You only have so much width in the wheel well for a tire size that can be used in your vehicle, no matter the type - each vehicle uses a type of tire for the terrain or conditions it is expected to be driven in. Some vehicles have a wide broad wheel well while other vehicles use a slimmer design that only can fit a specific size and width of tire for everyday driving.


Added for further projects...
 

Attachments

Last edited:
OP
Handy Andy

Handy Andy

Well-Liked Member
Premium Account
Messages
1,685
Likes
1,265
City
Grand Rapids
State
MI
Country
United States
What I Drive
2018 Ford Fiesta SE HB
Thread Starter #12
Putting this out here in this thread as part of a "heads up" you may encounter.

I'm sure you've seen these
1720358503226.png
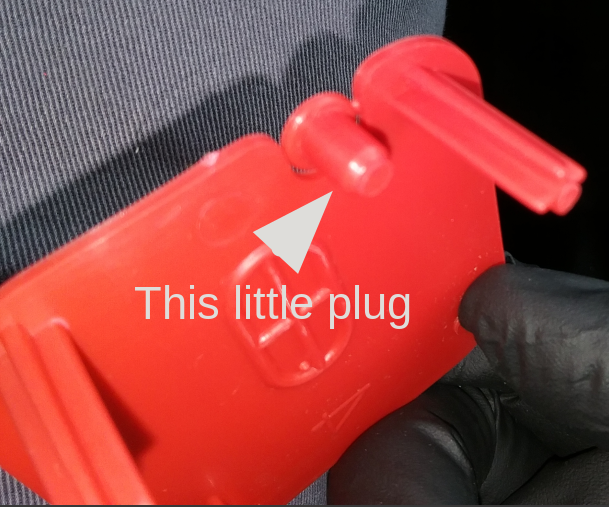
Yeah, it's a battery but see that Red cap?
1720358812735.png
There are several types of these caps that cover the RED post of these
types of batteries.
The part I'm referring to is that red button.
It is a plug designed to keep the Acid inside the battery from ruining your car.

This post is about those that may have to search quickly for a battery that will help them get to better help or away from a condtion that left them stranded - like a cold winter day and it's a blizzard outside.

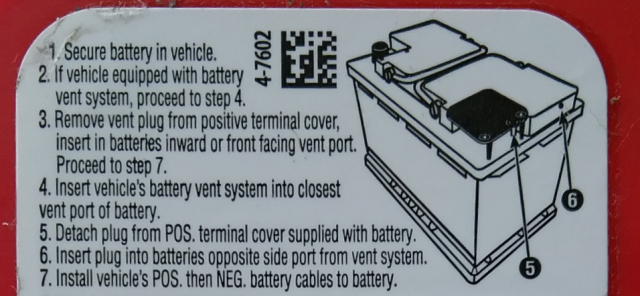
So when you're faced with few choices, you can find a battery with RED to the right post orientation, like the ones above, but if you come across that type of cap - be careful and use them per their instructions.

1720359286979.png
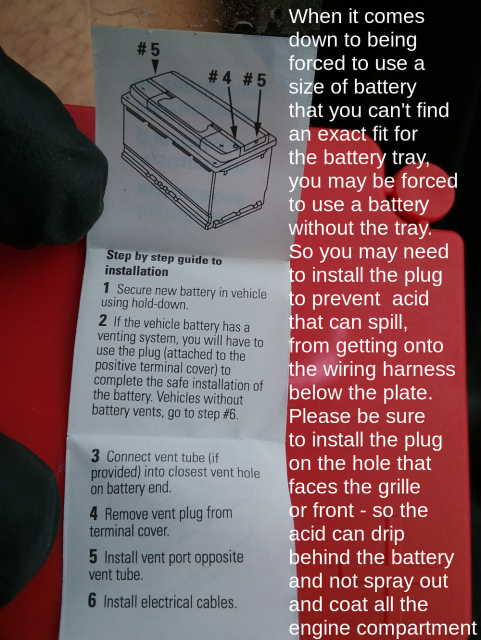
Some even come with a fold out to help you.
1720365010416.png

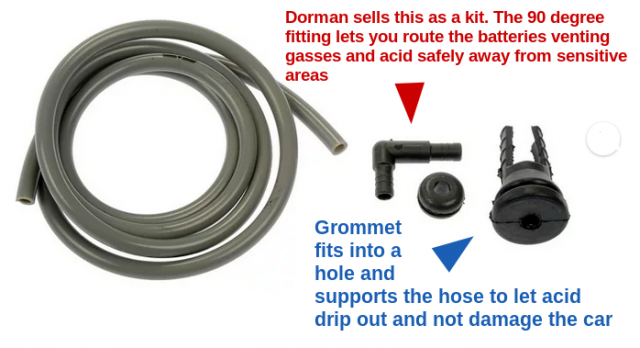
IF you can - you can also buy a kit to help you re-route
the corrosive venting gasses and acid away from sensitive parts
and let it safely vent them away.

1720366460220.png
Just be sure to examine the venting system carefully for the next week and look for drips of acid on the floor under the car - it may mean the battery vent tube is SIPHONING the acid away and you may need to re-route the hose and venting system so it does not drain and siphon off all the remaining acid
To be continued

Why? That plug is designed to cover one of two ports for a vent system - it also prevent Acid from making your day and ruining or at least spilling onto, the wiring harness located below that battery mounting shelf plate.

IF you use the battery tray, great - you can leave these plugs out but look out for the clearance height on the case. It can be too tall and can let battery vent acid into the engine compartment and if your driving it will spray onto parts you don't want it on.

Again this is for batteries that you have to remove the tray in order to get the battery in. That plug will help keep any venting acid from dripping out into the air stream coming from the grille and radiator fan blowing air - it can form a spray that will coat the inside of the engine bay and possibly shorten the life of any exposed wiring and metal parts and fasteners..
 
Last edited:

LionsTooth

Well-Liked Member
Premium Account
Messages
739
Likes
964
City
Northern
State
CA
Country
United States
What I Drive
2015 Fiesta SE HB Magnetic
#13
Tasty heads up! Thanks!


Top