• Sign Up! To view all forums and unlock additional cool features

    Welcome to the #1 Ford Fiesta Forum and Ford Fiesta community dedicated to Ford Fiesta owners and enthusiasts. Register for an account, it's free and it's easy, so don't hesitate to join the Ford Fiesta Forum today!


Heater Flap Position motor problem

NeoGeo

New Member
Messages
7
Likes
2
City
Lisbon
State
FL
Country
Portugal
What I Drive
Ford Fiesta 2009
#1
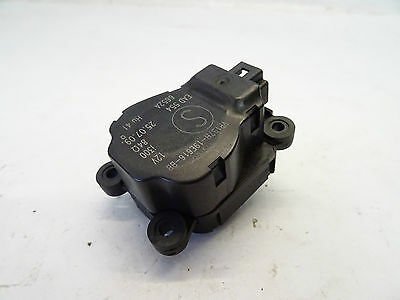
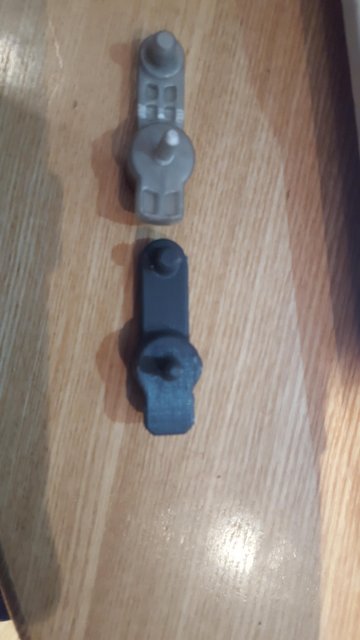
Hi All! I'm having a problem in my 2009 Ford Fiesta. I've tried to change the Heater Flap Position motor as I've noticed that not only the motor was not working properly but also the small "arm" that connects the motor to the flap that opens and closes was also broken. I've bought a scrap Heater Flap Position motor and it is working but instead of only opening/closing a percentage of the flap according to the set temperature, it only fully opens the blend door in the High mode, but if I turn it to 28º or 27º, it automatically fully closes the door. It should only close a bit and only if I set the temperature to 16º (minimum) should fully close the door. Do you guys have any idea of what the issue could be? Thank you!
 

Attachments

Handy Andy

Well-Liked Member
Premium Account
Messages
1,743
Likes
1,298
City
Grand Rapids
State
MI
Country
United States
What I Drive
2018 Ford Fiesta SE HB
#2
How to do you know that the flap originally only worked as a percentage of rotation?

The later models that "door and flap" work in pulse mode - unless the control is fully clockwise, then the flap is told to stay on.

  • Looked more closely at those pics, the Motor shown in newer pulse ones we have in our models in the USA.
  • Yours is a 2009 were you able to even locate the proper year of type - for the cycling event we have is "on to off to on to off" in any mid-point setting.
  • This poses a problem with older models - they may not recognize the motor and treat this as a "stepper" type pulsing to open the door but then it sees it doing something else - it's working with what it sees and seems to know - it's not 2021 - this was a 2009 model - vastly different construction.

The current models monitor air out side and in the cabin and "pulse" that flap when it is not set to the extreme ends.

You may need to operate the climate control and see if you can even hear, and feel - the door operating the heater core - but this must be done in a climate setting that isn't calling for AC - meaning no MAX AC or Defrost / Bi-Level Defrost (Floor vent and Front Windshield Defrost)

The flap can also get confused with the Recirc (Recirculated) where the air intake is shut off when the control is at "0" (O)
 
Last edited:
OP
N

NeoGeo

New Member
Messages
7
Likes
2
City
Lisbon
State
FL
Country
Portugal
What I Drive
Ford Fiesta 2009
Thread Starter #3
How to do you know that the flap originally only worked as a percentage of rotation?

The later models that "door and flap" work in pulse mode - unless the control is fully clockwise, then the flap is told to stay on.

  • Looked more closely at those pics, the Motor shown in newer pulse ones we have in our models in the USA.
  • Yours is a 2009 were you able to even locate the proper year of type - for the cycling event we have is "on to off to on to off" in any mid-point setting.
  • This poses a problem with older models - they may not recognize the motor and treat this as a "stepper" type pulsing to open the door but then it sees it doing something else - it's working with what it sees and seems to know - it's not 2021 - this was a 2009 model - vastly different construction.

The current models monitor air out side and in the cabin and "pulse" that flap when it is not set to the extreme ends.

You may need to operate the climate control and see if you can even hear, and feel - the door operating the heater core - but this must be done in a climate setting that isn't calling for AC - meaning no MAX AC or Defrost / Bi-Level Defrost (Floor vent and Front Windshield Defrost)

The flap can also get confused with the Recirc (Recirculated) where the air intake is shut off when the control is at "0" (O)
Hi there, the way for me to know the part of the percentage was that the first time I've took the motor out, still connected to the car, I've tried to reduce/increase the heat and I saw the motor only moving a percentage each time I did it. After I swap the motors, it stopped doing that and started doing what I've explained above.
 

Handy Andy

Well-Liked Member
Premium Account
Messages
1,743
Likes
1,298
City
Grand Rapids
State
MI
Country
United States
What I Drive
2018 Ford Fiesta SE HB
#4
Then the motor you have - is not the one that gives the Climate control (Via Body Control Module) the proper feedback for "position" - there is the motor that is / acts like a stepper motor to "bump" the vane - if you have the wrong motor, the feedback to the module that "looks" for advance / decrease and position is there for it to know how far to move it - instead it looks at the "temperature" sensor as it's "guide" and steps the vane fully open to match the climate setting.

The two types of systems unfortunately are not compatible.
 
OP
N

NeoGeo

New Member
Messages
7
Likes
2
City
Lisbon
State
FL
Country
Portugal
What I Drive
Ford Fiesta 2009
Thread Starter #4
By wrong motor, do you mean wrong part number? Because I've replaced with one exacly the same regarding the part number. And now, if I try to put back the "old" motor, it also doesn't follow the "percentage" path. It just fully opens or fully closes according to what I've explained in the beginning.
 

Handy Andy

Well-Liked Member
Premium Account
Messages
1,743
Likes
1,298
City
Grand Rapids
State
MI
Country
United States
What I Drive
2018 Ford Fiesta SE HB
#5
Ok, then there is something definitely wrong with the "driver motor controller" back at the Climate system.

The new motor is not able to tell the system it's position.

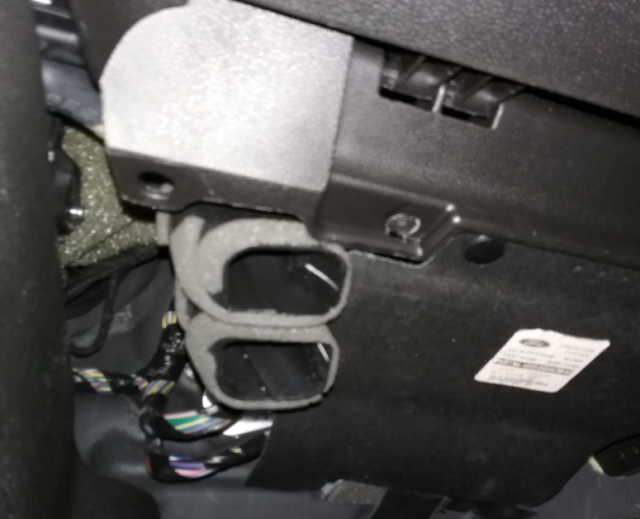
I have a system that "steps" and checks - the "check" is from the temperature sensor located on the passenger side, to the back of the glovebox and is part of the Cabin Air Filter assembly - that little clippy sensor - that goes right by that "vane" - checks air temp and moves accordingly.

So if the Motor goes to full stop, then you might need to check the cabin air temp sensor which is over by the Cabin Air Filter door. So that means having to remove the kick panel to get access....
1630584549506.png

There is an older system that is more "manual" - so I apologize for the confusion.

This air temp sensor if it's not connected or somehow got damaged I can see why the motor would cycle to the full stops - it doesn't "know" what to do except follow the users climate temp knob. To it, there is no middle to "check" against.

That is strange.
 
OP
N

NeoGeo

New Member
Messages
7
Likes
2
City
Lisbon
State
FL
Country
Portugal
What I Drive
Ford Fiesta 2009
Thread Starter #5
Hi there! Long time since I started this topic, and I'm still currently without a solution. The thing is that I want to sell the car, and I would really like to have everything at 100% before advertise it.

So, I've been looking and trying to find what might be wrong with the blend door actuator and I came up with some new info.

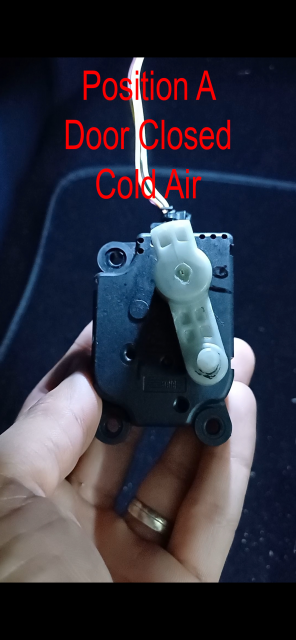
I've attached 2 images to serve as guides.

- The car is a Ford Fiesta MK7 from 2009

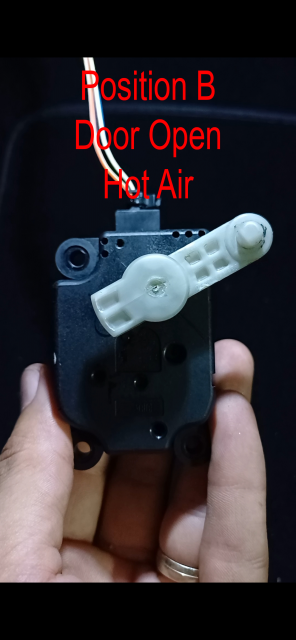
- There are 3 vp1s7h-19e616-bb motors in the HVAC system, all of them with different functions. One of them serves as a Blend Door actuator.

- Already bought 3 different blend door actuators and the problem still occurs.

- After shutting down the car and the ignition is off, the HVAC system performs what I'm calling a "automatic self test" precisely 5 minutes after the car is off. (This is important because it seems to me that the root of the problem lies in this "test") This test takes the blend door actuator from Position A to Position B and then it reverts back to position A, putting everything ok to be used in the next time.

- You can see in the images that the blend door actuator shoulg have 2 positions (Position A - initial, with cold air and Position B - final, with hot air) In my mind this should always be the possible gap between the two positions. Of course, within this range, there is a list of other positions according to the temperatures that exist between the minimum and maximum.

- If turn on the air conditioning, use it within cold and hot air and turn it off in the "OFF" button, no matter in what position the motor is, it reverts automatically to the initial position A, and therefore, if I turn off the ignition and shut down the car, the "self test" will remain in between the correct range of the 2 positions.

-The problem is that if I have the Air conditioning turned on in the position B (full heat) and I switch off the ignition without turning off the air conditioning first in the "OFF" button, the actuator stays in the Position B and therefore after the "5 minutes self test" begins, it assumes that the position B is indeed the position A. This way during the "self test" the actuator takes the rotation to a totally different position B and forces the plastic lever to a place where its not possible to the lever to sustain this rotation and breaks.

Not sure this was very clear, but I would really like to know if you guys might know what can be causing this.

Is there a way to "disable" this 5 minutes after the shut down "self test"?

Thank you!
 

Attachments

Handy Andy

Well-Liked Member
Premium Account
Messages
1,743
Likes
1,298
City
Grand Rapids
State
MI
Country
United States
What I Drive
2018 Ford Fiesta SE HB
#6
Sent a PM - let me know if it helps!
 

Onylz

New Member
Messages
4
Likes
0
City
Whitland
State
Non-US
Country
UK
What I Drive
2010 1.4 Titanium
#7
Did you figure this out, I’m having a similar issue but with the direction control motor. It’s snapped two lever arms and I was in the car the last time it snapped one and I heard it snap as it was doing it’s automatic position test after turning the ignition off
 

Handy Andy

Well-Liked Member
Premium Account
Messages
1,743
Likes
1,298
City
Grand Rapids
State
MI
Country
United States
What I Drive
2018 Ford Fiesta SE HB
#8
Check this link to this post.
https://www.fordfiesta.org/threads/new-to-the-group-have-ac-clicking-issues.7552/post-17838

They had a similar problem - if you run MANUAL control or have the AUTO-matic climate control system -both systems use different actuators and are not exactly swap-able.

The more elaborate system (Automatic Climate control with the push-button and thermo display) uses Actuators with built position sensors to tell the system where it's at in it's rotation - the system is trained by operation to know the various settings and where in position - by the readings the position sensors tell it - is at in the overall scheme of things. The after 5-minutes self check is for the system to close off the vents automatically and close down the system for the next cycle of operation.

IF the Electronic Air Temperature Controller EATC is damaged, has broken wiring or the position sensors are faulty - this system will begin a self-destruct sequence much like what you describe - broken actuator arms and poor ventilation - this is due to that controller and the Auto system not knowing where the actuators are in their rotation and it only can go so far in zeroing itself out and closing down.

The newer actuators are supposedly designed to be downwards or backwards compatible are not always going to be the go-to drop in replacement - for their signal range may not help the Auto system regain control due to that year they were made used a different set of values - you may have to help it find "ZERO" by removing the drums actuator and noting where the OFF zero point the arm moves to - and you may have to turn on the Climate FAN to high-speed to find where the ports are in the vents by the air blowing out of them to help the system find this rest spot (you turn the drum by using your fingers to rotate the gears to move those holes to their positions to find that zero) - then set the actuator in position with it in the hopes it's at ZERO - you may have to do this several times as the system tends to seek the "averages" of where the servo needs to be by a law of averages and set-points using the approximate values obtains by those positional sensors.

This is the best I can do for you - read the post at the link it may help you make some decisions in how to approach and contend with this problem.
 

Onylz

New Member
Messages
4
Likes
0
City
Whitland
State
Non-US
Country
UK
What I Drive
2010 1.4 Titanium
#9
I have the automatic AC in my Titanium and think I know what the issue is. I had watched a video about the usual buzzing in the dash from the cabin temp
Sensor and got in there and decided to just remove the whole sensor due to never using automatic climate control.

If what you’re saying is correct then I believe this must be where the system is tripping out and affecting any of the three actuators not just the actuator regarding the AC temperature as I’d suspected. This is my first port of call I’m going to get a fresh cabin temp sensor and go from there.

Thank you for your help there isn’t too much information that I’ve found regarding this issue of actuators repeatedly snapping lever arms and messing up their positions. There’s been no issues for the last two years regarding this lever arm snapping and now I’ve had two break in the last month and the only difference is removing the cabin temp sensor so I’m going to start there. Thank again
 

Onylz

New Member
Messages
4
Likes
0
City
Whitland
State
Non-US
Country
UK
What I Drive
2010 1.4 Titanium
#10
That didn’t do it, the motor is still operating outside of its intended range. I tried switching the recirculate actuator since they are the same I believe and the same issue happened.
 

Handy Andy

Well-Liked Member
Premium Account
Messages
1,743
Likes
1,298
City
Grand Rapids
State
MI
Country
United States
What I Drive
2018 Ford Fiesta SE HB
#11
Whoa! Slow down, there are some things I need to point out to help you with this...

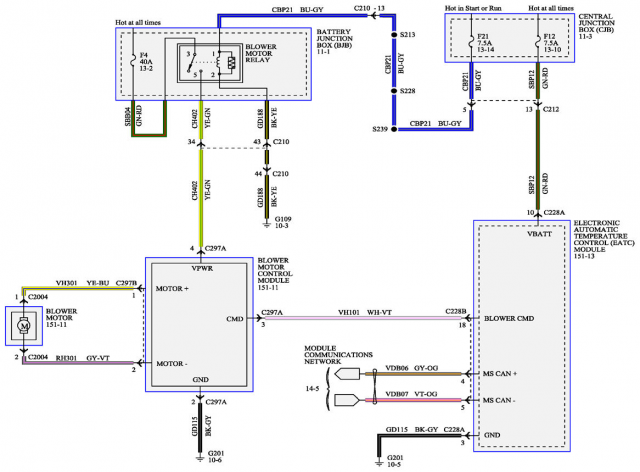
To start...this is how the EATC gets power and how it can tell the system what it can and cannot do - including the Blowers own Speed.
1735349291280.png

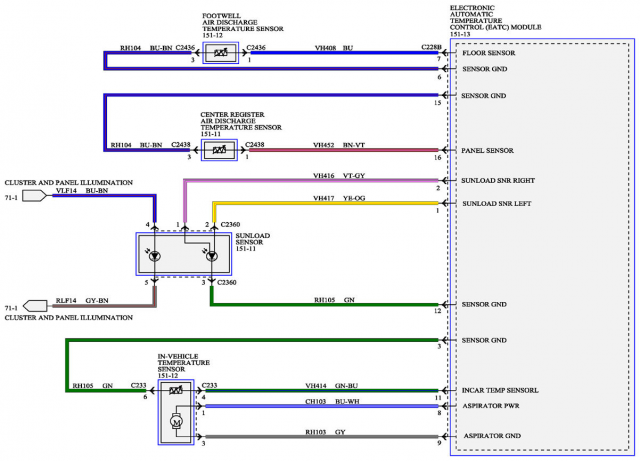
IT also has a way to look at temps - including several interior ones...
1735349182573.png
The above is the EATC "interface" or how it sees the temperatures both inside and outside as well as how bright daylight may be so it can use the communications system, that CANBUS - to tell the PCM what it needs to help develop its budget.

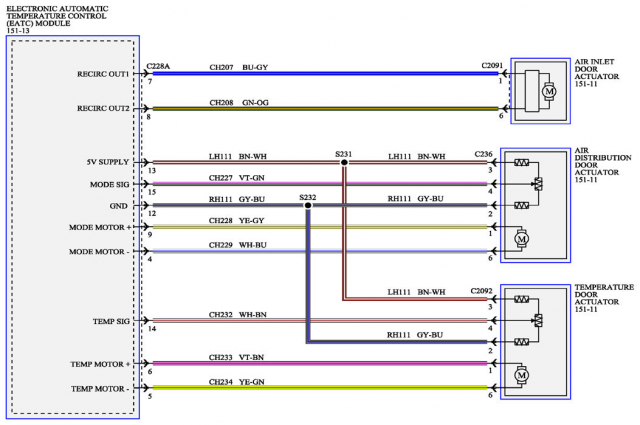
1735349419097.png

The above - this is where you may be having the problems of it trying to seek positions - it uses the EATC so do this - not the controllers panel - it's done behind the panel - and you can easily see how the actuators use the positional sensors - those squiggles in the schematic above - those wires connect Pins 2, 3 and 4 - that symbol is for a variable resistor and the two squiggle-boxes above and below it are resistors too - those two also buffer the output so it doesn't "zap" the EATC controller either hard to ground or hard to power source - which will destroy it.

This is part of that problem - the variable may have failed - so one line went open - but the other one was still connected to either side - it should be fine but doesn't mean that is connected correctly. Especially when you have torqued off arms and broken plastic - you know something is either jamming the drum from moving - or the unit can't find "home".

The better way to approach this is to pull the battery once everything is at rest. Reset the unit - reattach the battery and start the vehicle - Just try to use a simple floor vent when you start the car and feel ALL the vents when it goes to the floor setting - because if the cogs on the drum are off to the positional sensors you'll know by the feel of the air blowing out of the vents - that jam that caused this will only break those arms again because the drum is reaching full stop before the EATC says it is. That's the contention.

Then what you have to do is remove the actuator and you may have to turn the gears to help it find home - install the actuator - reset the battery again, reattach power and start the car - and these steps help the thing find it's resting spot.
 

Onylz

New Member
Messages
4
Likes
0
City
Whitland
State
Non-US
Country
UK
What I Drive
2010 1.4 Titanium
#12
So when I disconnect the battery and restart the car I’m selecting the floor vents even without the air distribution lever arm attached? Also when you say turn the gears of the actuator does that mean pulling it apart and moving the gears inside because I cannot move the gears manually from just the outside of the motor. I currently do not have the actuator and lever arm attached in the car because I cannot get the motor to rotate to the correct angle for me to attach the lever arm and put everything back together, i can try and keep fiddling to get it to rotate the right way, so i can attach everything back together and follow your guide but I worry it will snap the lever arm again.
 

Handy Andy

Well-Liked Member
Premium Account
Messages
1,743
Likes
1,298
City
Grand Rapids
State
MI
Country
United States
What I Drive
2018 Ford Fiesta SE HB
#13
Hmmm. If you have problems with that actuator - if you have the original - then the arms and the throw have to the same (that push rod) you should have no change in size of anything.

So when I disconnect the battery and restart the car I’m selecting the floor vents even without the air distribution lever arm attached?
Yes, I meant you see operation and feel air - if using the floor vent when all the system is running - does it only push air to the floor vents - not leaking out considerably thru others?

What I'm trying to diagnose here, is if the Actuators built in sensors - are working and communicating correctly or is the drums actual position off to actuators thinking - as if; EATC tells the actuator to move here, but the Drum stops moving and hits it's limit stop (not limit switch) and the actuator keeps pushing until it breaks.

Turn off the whole system - does any erroneous noises like clack clack or strong thunks or any binding noises heard?

Operate the controls and Watch the Actuator too - it may move more than it should - so that may indicate one; the actuator range is not correct - two; the EATC is looking for a value that actuator can't attain so it fails by breaking the arm - or three; hopefully a simpler one, the Drum is out of alignment to the actuator turn - so the drum just needs to have itself re-centered to the actuator gear

Then when it does the self-test - that point seems to be where most of these errors by my references and experiences with both theirs and my system - the arm snaps when the binding occurs - but it makes a considerable groaning noise and even makes a section of the air vent either lower or center console move then SNAP - you can even see it "bounce" - you may even see dust lift out of the vent when the break occurs.

There are several approaches but one main one is it's relearn process - for that should happen by itself when you reconnect the battery and let it operate thru the settings you select.

That's why I mentioned the effort, for if you had it apart and just wanted to find floor - pull the battery - reconnect; then you simply connected the unmounted actuator to the connector.

Leave it unmounted and just watch it's operation by seeing how that (actuators) cog turns - the actuator that controlled the drum, (for example) turn on the regular heat setting and watch it turn;

Try to watch for;​

  • the direction it rotates and count the turns
    • - because you'll have to then rotate the drums' gear in a fashion that makes just the floor vent work
    • - when you turn that drum gear, you'll hear that air rush thru in different ports
  • - then you should be able to turn the drums gear to make the floor vent work and only the floor vent.
  • Center it on the floor vent - for it may have some room of range for the drum to turn before it is only on the floor.

Why? Ford and some others like GM - "swish" the air between one port to another and back again to help stir the air and maintain some level of even-airflow in the cabin. I know the Focus does this - even on their manual system - to help keep the windows clear and you can keep warm on the colder days as it "oscillates" - you can even hear (and feel) the operation when at a standing stop at a light. You may also find the actuator seems to want to seek - this is that "swish" as it bumps the drum to make just the floor setting it's main setting and if left alone it may continue to seek.

Now since I have only the Manual Climate - I do not see any mention, disclosure or any sort of extra "bottoming out" limit switches are used, just the positional sensors that are INTEGRATED into the Actuator - not the Drum itself. So the next step would be to find breaks in the wiring so an inspection is going to be done if the actuators pass the above test and only turn to a specific number of turns and sit there with minor corrections at any given moment in time.

So if an actuator wiring harness is bad, you have to back-probe the wiring at the EATC end to see if voltage does arrive to the actuator and returns to the EATC

Continuing...

The best way to diagnose the condition is to make sure the drum can freely move to the various positions as the engine runs, the blower motor works and the temperature door actuator - is trying to close or open the door.

We Beat That Drum to Death...onto your original condition of Temperature...

Another thing to diagnose because it does happen; jamming the temperature door because something fell into the flap and now affecting the ability to open and close - did you recently have them change the Cabin Air filter?

In one instance - the service tech told of how the fuse to the heater blew, and so they simply replaced the fuse (Summer conditions) gave it back to the customer with the open invoice to make sure it works. It didn't (Close to winter) - so it was brought back and in this case the door was jammed by a screw that fell into the opening when they changed the cabin filter.

How that was discovered; - it was preventing the temperature door from fully swinging and would not blow the fuse, they replaced the actuator but it did not fix the problem until they look in past the filter and observed the door. The fuse blew to protect part of the climate system but took out the EATC unit controllers driver parts to it.

So it had no way to move that vane even though the hoses in the engine compartment were both hot from the fluid flowing thru it - the door / valve - stayed in that one position.

So the actuator was pulled and checked, seemed ok.

However, the EATC does not have a diagnostic for itself to say - "This is wrong" - they don't always have a code programmed in the DTC store to help figure this out - at least FORD didn't put any sort of programming in for it.

Many would have just replaced the EATC - only to be cautioned that the EATC will burn up again if the door is not checked for movement. It was in this test - did the service tech find the door / vane was binding and was able to use a magnetic fish tool to pull out the screw and restore operation. So one new actuator and one new EATC unit...
  • What this means? The door got jammed, with an object - a screw - which can fall into the cavity where the Air Filter rests. If the screws were not all accounted for (I don't know) the screw or a screw, from the top of the console - can roll down into the vents and eventually work it's way down into places where it can bind or jam a moving part or hinge and prevent it from moving and can affect operation to a point that a catastrophic fault can occur.
However - in all of this; look above in the schematics - the last one - shows the Motors - and remember that the power is DC - which means these motors will run in a given direction by the POLARITY of the power applied.

So two wires are power - but you don't or not easily find ground or power unless you measure it and can understand what the tools display is showing you - so look for MINUS symbols to understand the Door operations. The other three wires from these actuators send a trickle power - which when you look at the way the power flows thru the positional sensor - the cog it uses to follow the motor if the wiper arm is of a different composition reading (ohmic) it will affect the balance of the voltages read across these three wires to the EATC which then tells you you may need to either find a new actuator of the same revision code or replace the EATC and all the actuators - which gets cost prohibitive.

The problem then becomes the older units ohmic range is different than the newer ones which then means, the older EATC will need to be upgraded if you use new actuators because the older EATC unit can't figure out the position results when the arm moves due to the out of range readings the EATC can't process, so it can result in a burnt out EATC or snapped arms on the actuators - or both.

This is why the system power - the battery gets pulled so the EATC can see several things, including new readings that can help it zero the system and start anew. If the actuator is not of the same year or revision it may not be able to know "zero" or understand the current sense it receives (the level of voltage applied as current) so it can't understand where it needs to be so it will just spin in place until something breaks.
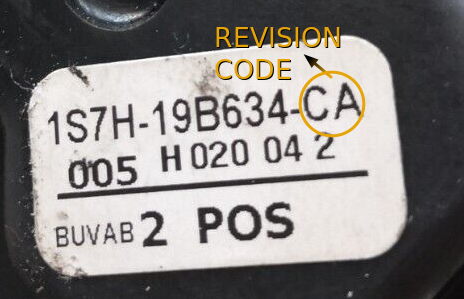
1735492394750.png
If you can - use a REVISION code
(last two characters of the FoMoCo String)
that is similar to what you have.
The closer it is,
the better your success rate will be
with and by the EATC recognizing it.​

So, if you can't find any, or the one replacing it is a newer revision code than the OEM one broken in your hand - that may mean you will have to replace the EATC unit itself to use the newer actuators. OR cannibalize the actuator from the new and use old parts in it and keep the new arm - or somehow swap enough parts to make the actuator fit and run.
 
Last edited:

Similar threads


Top