The adjusters have to be manually done by removing the wheel and drum, then turn the adjuster until the drum - slides on with a slight drag as the shoes are close in size to the tolerance. The wheel when mounted should turn freely still - by hand for at least three revolutions to prevent too much drag to help seat and position the shoes to the aspect of the drum.
The shoes use pins and a spring pulling them together against the lower pivot and seat - so if the adjustment screw is too close inwards (short to drum) or the pins are not seating right - it will take some time to turn out the adjuster to make the shoes contact once at rest - else the wheel cylinder pistons just flop back and forth until the shoes balance their contact and begin the braking action. IF the pins are not set right, this won't work until the pins seat fully and hold the shoe to the backing plate.
So many say, why not just adjust the tension on the handbrakes own tensioner? That would work if the cable was replaced - the key here is in the reassembly - if all things were equal - the shoes and cable adjustments are not needed - just a tweak of the star adjuster to engage the shoes. They tell you to back-up so the shoes do make contact together, and they can tilt backwards to release the lever from the pawls to make the screw turn and adjust that way.
The Adjuster then can be "adjusted" by driving some time using the brakes - firmly - but not to cook them or stopping too hard for your safety for setting the shoes to seat against the drums - then the adjustments are done when the vehicle is backed up slowly at first to let the adjusters "tilt" to take the locking lever off the pawl - which is keeping the screw from turning.
The key here is to make sure the shoes are contacting the drum as you apply the brakes, if they are too far out (of adjustment and the screw is not pressing them outwards for contact), one shoe moves before the other and they may not be able to adjust properly for the wheel brake cylinder pistons themselves may extend too far and your out of range to apply enough pressure to BOTH shoes (the pair as one piece) at the same time.
The key here (
then...I use a lot of keys here - and some are just PUSH TO START ![[driving]](/images/smilies/icon_smile_driving.gif "Driving [driving]")
![[drummer]](/images/smilies/icon_smile_drummer.gif "Drummer [drummer]") )
) is to make the shoes contact the drum firmly enough while backing up slowly and apply the brakes.
That action makes the drums reverse direction, then the tilting action occurs and you need to make (apply pressure), to tilt the shoes and take that lever off the pawl - to let the screw adjust using firm pressure on the pedal - but it can't do that if the pistons can't force the shoes out to the drum. Especially if it's fighting the front calipers that are already pressing on their rotors.
What is working against you; is back at the master cylinder - it's two sections are tied together and only move so far and only hold so much fluid per section and per press - so the system can't flow more fluid into the rear brakes not without some help from you and setting the shoes to drum initial clearance correctly.
For once you apply brake pedal, the reservoir is closed off to let the two sections and their pistons at the master cylinder - move the fluid into the cylinder and caliper (develop pressure) - but it will stop (the pedal from moving more) once the front calipers are pressed, and the ABS system prevents the back-flow equalization to prevent failure - you applied bakes - so it seals the system until you release pressure and the pedal returns to rest. IT tries to apply the brakes to all the wheels - even if they are not adjusted right - but ABS keeps them separated as individual lines during the braking effort until fluid can flow once the foot is off the pedal. (The ABS system is past the Proportioning valve - if there is even one in there - so the ABS being after - keeps fluid in the lines to their respective points but does not let fluid flow between until the brakes are freed).
You can try to accelerate this by using the handbrake lever and applying the pedal at the same time in a type of pumping action, firstly to push more fluid into the wheel cylinder to counteract that springs effort - secondly to make the screw work against the pawl to move the shoes towards the drum by forcing one shoe to the drum thru that lever - expanding the gap to let the screw see slack and start turning.
To work this, as it's loose and takes up the slack, that handbrake lever moves one of the shoes and the piston of the wheel cylinder. The Shoes together with the pistons, make a type of vacuum to pull fluid in and the cylinder begins to work towards a central balance internal to itself - the spring works against your effort as you keep you foot off the brake pedal but the handbrake is applied to pull the catch off the star - then apply the brake pedal, pushes fluid you let drain into the cylinder to move the shoes as one, forcing the star adjuster to work the screw until the other shoe makes contact. You have to move the handbrake lever to just the right amount of tension to help develop the braking effort and you can feel it by the pedal changes aspect of pressure and as you work this it starts to become stiffer and stiffer - it's tedious and takes a bit of timing to make it work right especially driving backwards - so you're better off to just jack up the car and move the adjuster manually then reseat the drums and wheel to check drag.
The ding-dong on the console will be annoying while you do this so keep the windows up; it's just letting you know the parking brake is engaged - if you have the center console removed for other service, then just pull that connector off the handbrake and it won't bother you again...Remember it won't show
BRAKE when that handle is engaged. Only when there is a problem with BRAKING system dealing with Service Brakes (Power Assisted Brakes and ABS), not Parking Brake (Handbrake) - Remember this for MOT for UK and other countries.
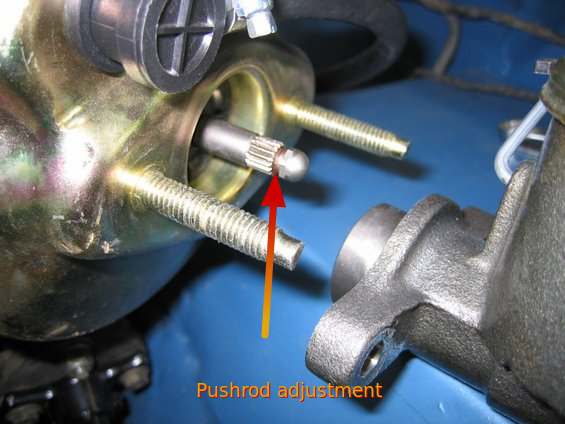
So for the others that may see this later, there may be other conditions that do not let the brakes adjust freely at times. This may be due to the Master cylinder to Brake Pedal clearance which can prevent the brake fluid from refilling the lines for the next time the brakes are applied - in earlier systems there used to be an adjustment for setting the pedal to master clearance by adjusting the length of the push rod itself - which may have an adjustment screw and lock-nut on the push-rod - but you have to remove the brake pedal to obtain the push-rod and that is no easy task.